Tuesday, May 27, 2008

Nails

When you look down at your nails what do you see? Do you see a well manicured paw?


Here are some simple tips to keeping your nails in tip top shape!

1. use Cuticle oil daily - I keep mine at my desk, When I have a minute I put it one and rub it in. 2. get a good hand cream - I keep this too at my desk. The soap at works is horrible at drying out hands; so it gets used frequently!


3. Push back your Cuticles - You can do this after you have used your cuticle oil or after a good soak in warm water.


4. Buff the flakes off of your nails


5. invest in a buffer that will shine your nails


Other options


1. the Nail salon....Now, if attempting to use the nail salon; you MUST be vocal... Even if they pretend to not speak English.. You can get your point across. I once got into a verbal argument right there in the nail salon because the man was going to give me the square, white tips down to my cuticle, porn star look they he did on every woman that walked in... OH NO!!! I don't want my tips that far back; but miss you have to do to often if not... um, I don't care... I also want them round... No, miss this make you look old.. the young girls down square... Do, I look like I care if I look old? NO!! I want them round. And while we are at it; they are too thick; they need to be thinner!


My point is - if you want your nails a certain way - tell them; they may make fun of you, but they get it.


Now how do you know what type of nail to get at a salon?


Here is my rule; if you have great nails, meaning you can actually grow them out to where you don't look like you enjoy them for breakfast; you don't really need nails. Maybe a manicure every two weeks or so to keep them in shape; because who doesn’t want to be pampered... really!


If you have weak brittle nails that are no hope -I recommend Solar nails. This is why, they stay looking new longer. They are buffed to a shine so the polish never flakes or wears out. And pay attention to your natural nail; have them duplicate the same for the solar nail. Just because it is a fake nail doesn't mean we want it to look fake... I mean come on; not all of us are blessed with fabulous nails... Some of us have to work at it.


Acrylic nails - are great if you are on a tight budget and you just need something.


Silk nails - this is when they actually apply silk fabric onto the nail bed. I do not care for this look. It is noticeably fake... And it doesn't even look that good.


Solar nails – I believe they use the same acrylic products however; because they use a different process the outcome is different and much nicer.




Tuesday, May 20, 2008

How to choose the right foundation for you..


Picking a foundation is a rather tedious job and can be expensive if you get it wrong multiple times. There are secrets to getting this right. First things first, NEVER be afraid to return something if it is not what you expected. Stores expect this so don't feel bad. And don't let miss/or mr.. counter person make you feel bad. But, how often do you get the third degree from a dude about your makeup being wrong AND the ladies should understand.. so why the snarly face or snake eye? It just didn't work it, it turned my face purple so just give me my refund...


So, when it comes to choosing your perfect foundation; some things to remember!


1. Always check it in the sunlight.


2. Always use the nose - cheek area for a strip test, NEVER use your hand or neck. Hello, they are different colors than your face.


3. When using the strip test; never rub in, after it dries if it is the right color for you, you will hardly be able to notice the makeup strip on your face.


4. Always apply makeup in a well lit area. Not your closet. Set yourself up with a nice area for applying makeup; invest in a makeup mirror that has a bright light on it and use it. Who knows you might even notice some other things when you look in that little bastard!


5. Determine how much coverage you need... Most woman think; wow I need full coverage.. I have news for you; unless you have peperoni face, birth marks, or some skin discoloration you don't need full coverage. I would venture to say that for about 80 percent of women light coverage is more than sufficient. Anything heavier than that and you are going to look like a Geisha.


6. Heavy coverage / full coverage is for people who have some serious "flaws" to cover. Freckles don't hardly count. They are cute; embrace them, they will never go away! So enjoy the extra color they bring to your face and work them to your advantage.


How to do a strip test.


Remove all makeup from face. Take a Q-tip dip into the foundation that you are testing. Then strip from the nose across the cheek. This is were most of your color variation comes from in your face so this is the area you should always test. Always look at this under the brightest light you can find. Sunlight is best.


How do I know what formula to use?


This is when you are REALLY going to have to look at your skin texture and type. What I mean by that is; are you prone to breakouts? Are you oily in some places but not others? Are you dry? Does your skin change depending on the year. My best recommendation here is do your homework; ask for help, go to a makeup counter; my favorite is Clinique. They will sit down with you to help determine your skin concerns and help you correct them. If you have acne prone skin there is foundation that will help combat that. For dry skin there is anti-aging makeup. The more dry your skin is the quicker you are going to age. So really take care of that by using the right makeup. If you have oily skin you will want to use a makeup that is oil free or that will help remove excess oil from the skin without over drying.


How do I apply the foundation?


There are lots of variations. And really it falls into whatever works best for you. But always start with the foundation in the center of the face and work your way out; that way you don't have streaks for a hard line.. (you know what I am talking about) I start with a dab of foundation in my fingers, I rub it a bit to warm it up then I apply, preferably before my moisturizer is dry. If you have acne prone skin; things are a bit more complicated for you. You can use your hands however; you MUST wash your hands before and after you apply your makeup, otherwise you can do future damage. What is recommended for acne prone skin is using throw away sponges. Use them once and toss. Don't even look back. You can buy them just as cheap as cotton balls. If I had the luxury... (dreaming.. maybe one day) I would airbrush my makeup on, allowing me to achieve the perfect balance of coverage and color!


How do I plan for my summer face?


Now for summer foundation; I have a totally different set of rules. For summer I suggest going with a tented moisturizer with SPF (at least 15, the higher the better). A tented moisturizer is going to allow you to more flexibility for color. And the bonus is that is still has some great coverage without others being able to notice an increase or decrease in color. Now they also have SPF protection for your lips as well! I highly recommend. I LOVE the clinique lip gloss formula! But that is a completely different topic!


How do I Finish the look?


You should ALWAYS set your foundation and the rest of your makeup with a loose powder. You might be thinking well, what in the world will this do? Or will it make me look chalky? Absolutely not! What this does, and it works fabulously for all skin types is set the makeup. Apply loose powder with a brush and sweep it over the skin in circular motions. I use Clinique Gentle light powder. It has a light, silky feel and leaves a very subtle shimmer behind.


Friday, May 16, 2008

Sunless Tanner................ahhh


So it is that time of year again when everyone wants to be a bronze goddess! However, some of us, the ones who think about the ageing process of our skin, are more practical about how we go about being the bronze goddess. And some of us gave up a long time ago, because lets me honest, I don't have to time or energy to keep up with it... That is where I stand... Right there, in that I don't have the patients to manage the upkeep. I have tried and I have tried, I admire those who can be persistent and have a nice skin tone. But it is not me. However, I have discovered the right and wrong ways to go about achieving the perfect glow from the sunless tanner.

This is very critical ladies! If you don't do this right you will suffer for at least a week. Sometimes even longer! First things first let’s talk product… You can’t be cheap here ladies… You get what you pay for is not just a cliché, it is a true statement! I have a couple of go to products when I need the glow for an event or perhaps an evening.. Or maybe I just choose to wear shorts that day and I need something instant. I am great at applying when I need it, just not good with the upkeep.

So, here is what I have found. If you are good at putting on a daily lotion, then you can get away with a gradual self tanner. These tend to work great and they do gradually give you a great color. If you are looking for a quick bronzed look and you only have a short amount of time, there are some great products out there. Don’t give up ladies each year these products are only getting better and better! It is like the computer each year something new and ground breaking comes along! So don’t ever give up on them completely. And try different products and don’t forget to try a different company. So, I have stumbled onto L’Oreal Sublime Bronzer gel and spray. I LOVE this stuff! This stuff works so quickly! The spray is great; it develops within a couple of hours. The gel is instant.

Rule number 1 before applying self tanner…
ALWAYS exfoliate… If you forgot this step, your tanner will not last as long, but it isn’t the end of the world.
Next, apply regular lotion, nothing with a tent or a gradual tanner. Applying regular lotion will enable the self tanner to not overdue certain areas… like knees, heels, elbows, toes… I always mess up my toes, but I am getting better. Also, another way you can keep these areas from over bronzing is to use Vaseline. As easy and basic as it sounds it is true! Plan ol’ Vaseline. Just lube up those areas then use your tanner.

Another very important thing to remember if you are using a spray tanner, do NOT put it up close to your skin. This is BAD and will look horrible and runny! Keep your distance and spray away. Also, don’t do your toes.. The drizzle from the rest of your body has covered your feet well. No need to over apply!

I hope this helps ladies. Now go get bronze!

Thursday, May 15, 2008

Smokey Eyes


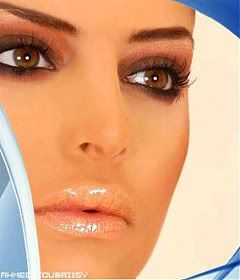
Today from the request of a dear friend I am going to talk about Smokey eyes! Every woman wants them.. But how do we achieve the perfect smokey eye without looking like we have a black eye, are a porn star or even worse weird lady with WAY too much makeup on…

First things first; put on your foundation make sure you have it seem-less. Then place a little uplighting under your eye (at the top of the cheekbone and inward). If you have dark circles naturally, try adding uplighting to the interior of the corner of the eye. This will lighten the eye area. Next, pick your colors. If you are light skinned try for browns, peaches, Burgundy's. If you are medium tones, you have the whole world to play with, but if this is your first time, try greys, purples, dark greens or blues. Stay away from BLACK! This will do what we talked about above... We don't want a black eye, so don't put it on, at least while you are still new to this.

Now that you have selected your color add your lightest color from the base of the lid up to the eyebrow. Come over next with your next darkest color in the picture it would be the peach color. Place that in the crease of your eye. Go below the bottom lashes smudge a bit down there. Q-tips work great for this, or a small eye liner bush, one of my favorite make-up brushes! If you don't have one; you need to invest! Next come over the base of lid with your darkest color. Don't be afraid that it looks to dark at this point. It is will look slightly awkward until we complete the process. Remember to smudge it to the outside corner of the eye. Add a small line below the bottom lashes with your eye liner brush (or Q-tip).

Next, using the eye liner. This is the crucial point. If you are to complete the smokey eye look you can't be afraid of the eye liner... In the picture she used a deep brown black. Compliment the colors you have used on your eyes. If you used browns stick with a brown. If you used Greens go with a dark green. Line your lashes with a bold yet fine line of liner. On the top go completely from corner to corner. DON'T STOP HALFWAY! On the bottom half do the same corner to corner. Use your liner brush and smudge the liner before it sets. If you are using cream liner you have an advantage, you can smudge as your are placing the liner. I recommend cream liner, it sets quickly usually in 30-45 seconds and it wears all day long. I use Clinique cream liner in Black Honey, daily.

Now that you have your eye make up almost done lets talk about the rest of your face. If you have smokey eyes, your lips need to be nude and your cheeks bare. So choose colors accordingly. You need a little something there so you don't look like Casper but only play up one feature at a time. A nice nude gloss like the one pictured goes a long way on the lips. Set your makeup with your loose powder using a powder brush.

Finally, come over the lashes with a mascara. In the picture they used a black brown. My recommendation, unless your hair is dark brown or black, don't use black mascara. Do your bottom lashes first. Apply to the ends first then work your way into the eye. That goes for both the top and bottom lashes. After your first coat of mascara dries apply your second coat.

Now your look should be complete without making your look over done. If it isn't just perfect keep practicing, work at making the perfect smudge transition to the outside corners of the eyes. Also, play with the colors that you use. Don't be afraid of color, Just remember to avoid looking like that girl who wears too much makeup, only play up one feature on your face at a time. If you remember that rule you should be rockin' your smokey eyed self!


Welcome!

I was inspired to write this blog thanks to my friend, Proper Paige. You should check out her blog at www.simpleetiquette.blogspot.com as well. She will give you all the 411 on Etiquette.

This blog however, will focus on something slightly different, but maybe closely related right? If your etiquette is well sculpted you will appear more attractive right. Well, while Proper Paige is working on the inside, I am going to work on the outside! Get ready ladies and gentlemen; I have lots of useful beauty secrets to spread!

I am excited to share my only source of wisdom!